
HD Digital Microscope For Soldering 60MP 48MP 13MP 4K HDMI USB


HD Digital Microscope For Soldering 60MP 48MP 13MP 4K HDMI USB
SPECIFICATIONS
Battery Included: No
Brand Name: YIZHAN
Certification: CE,Dot
Drawtube: Monocular
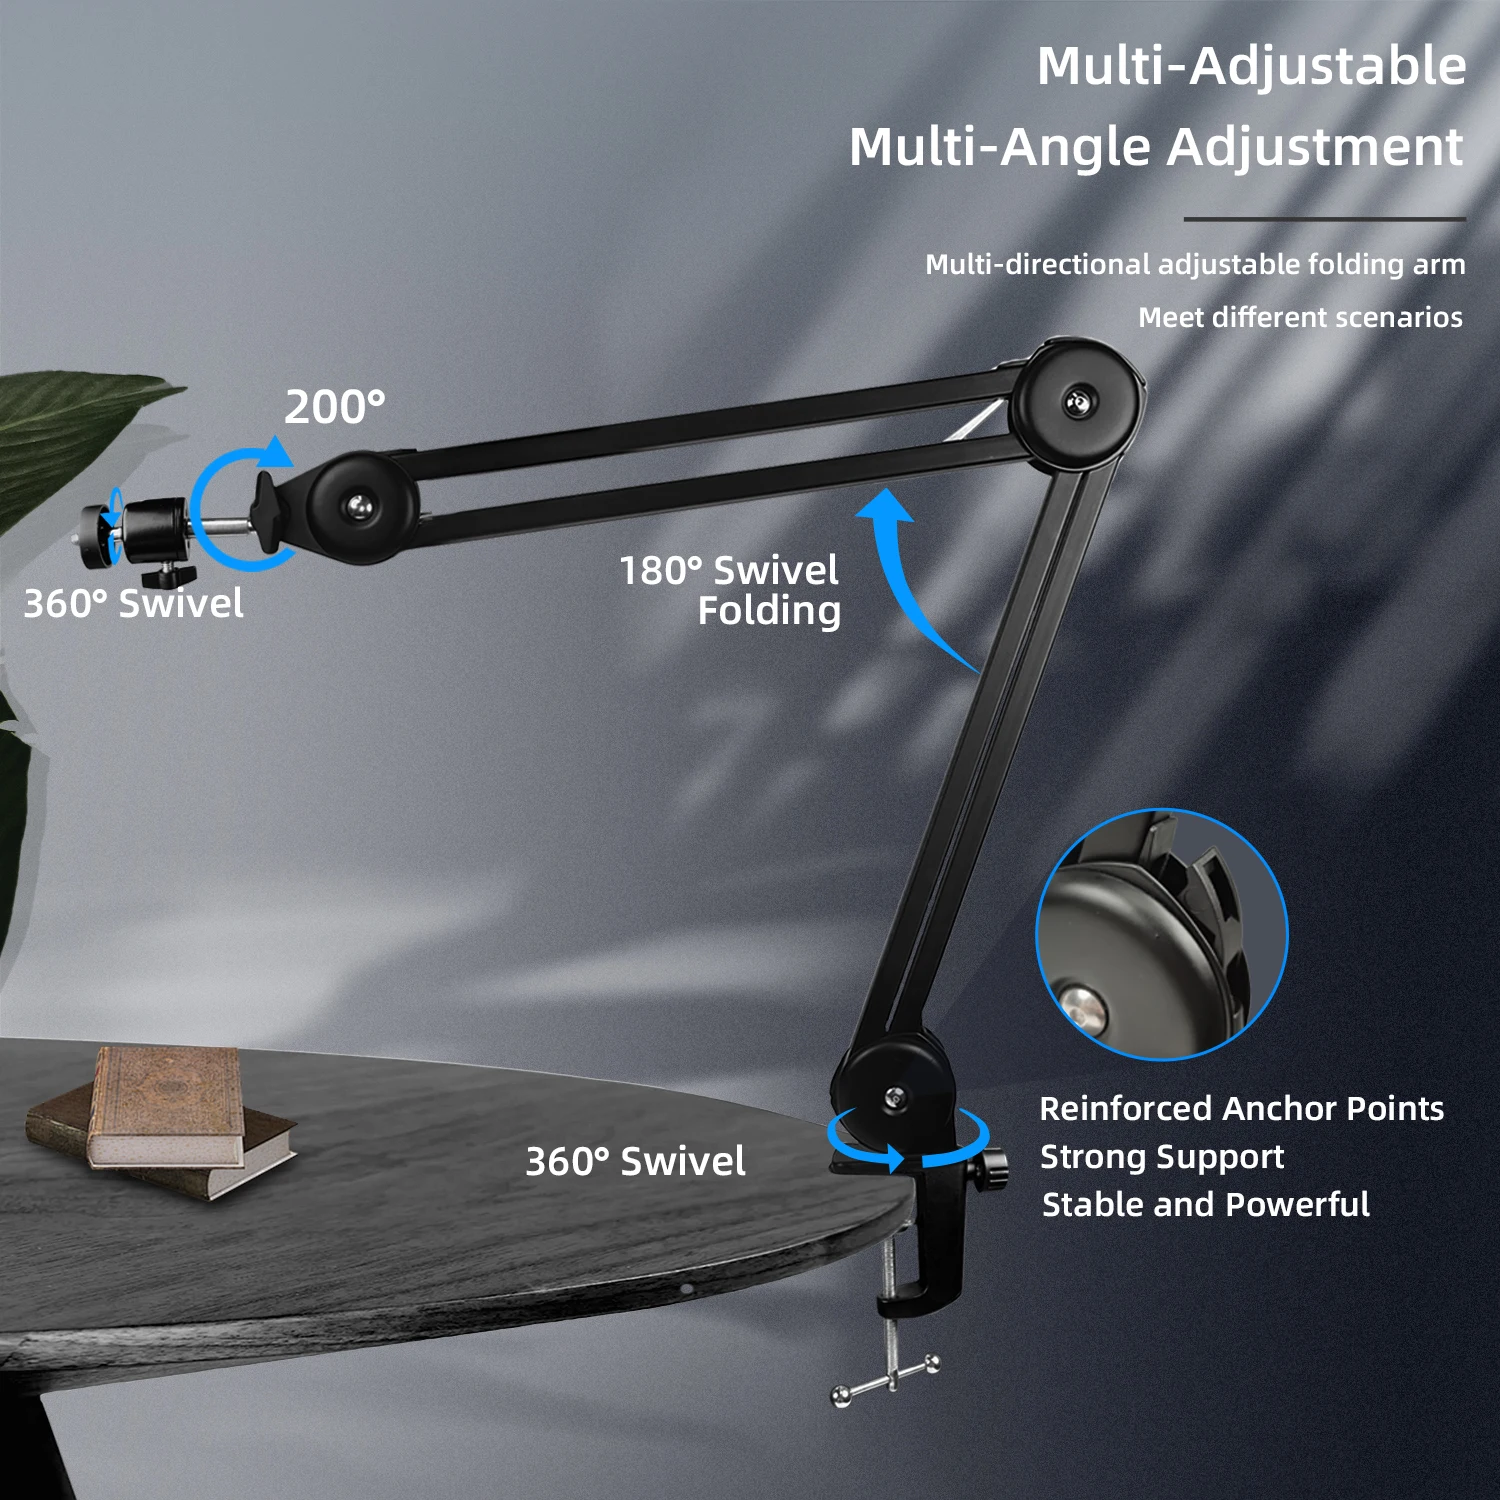
Feature 1: digital microscope for electronics repair
Feature 2: 60MP 48MP 4K HDMI microscope camera
Feature 3: microscope for smartphone
Feature 4: microscope for soldering
Feature 5: 60FPS/30FPS
Feature 6: simul focal microscope VGA
Feature 7: jewelry microscope
Feature 8: kids microscope
Features: High Definition,Handheld,Portable,Digital
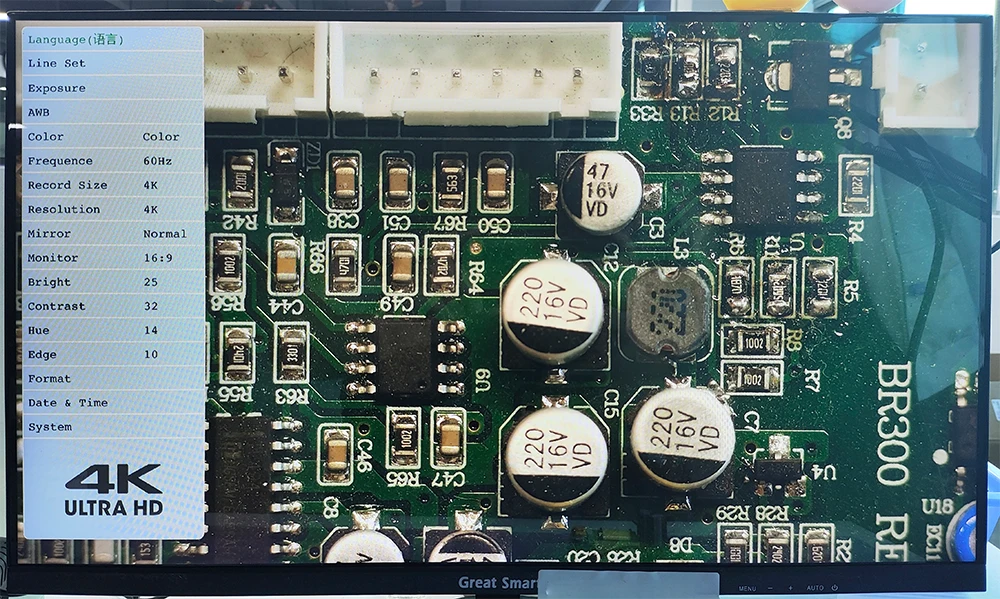
Frequency: 50Hz/60Hz
High-concerned chemical: None
Illumination: 56pcs LED Adjustable LED Ring Light
Is Smart Device: Yes
Magnification Ratio: 500X & Under
Material: Metal
Model Number: YIZHAN8-1605B-130X
Origin: Mainland China
Theory: Video Microscope
Zoom C mount Lens: 130X 150X 215X C-MOUNT Lens
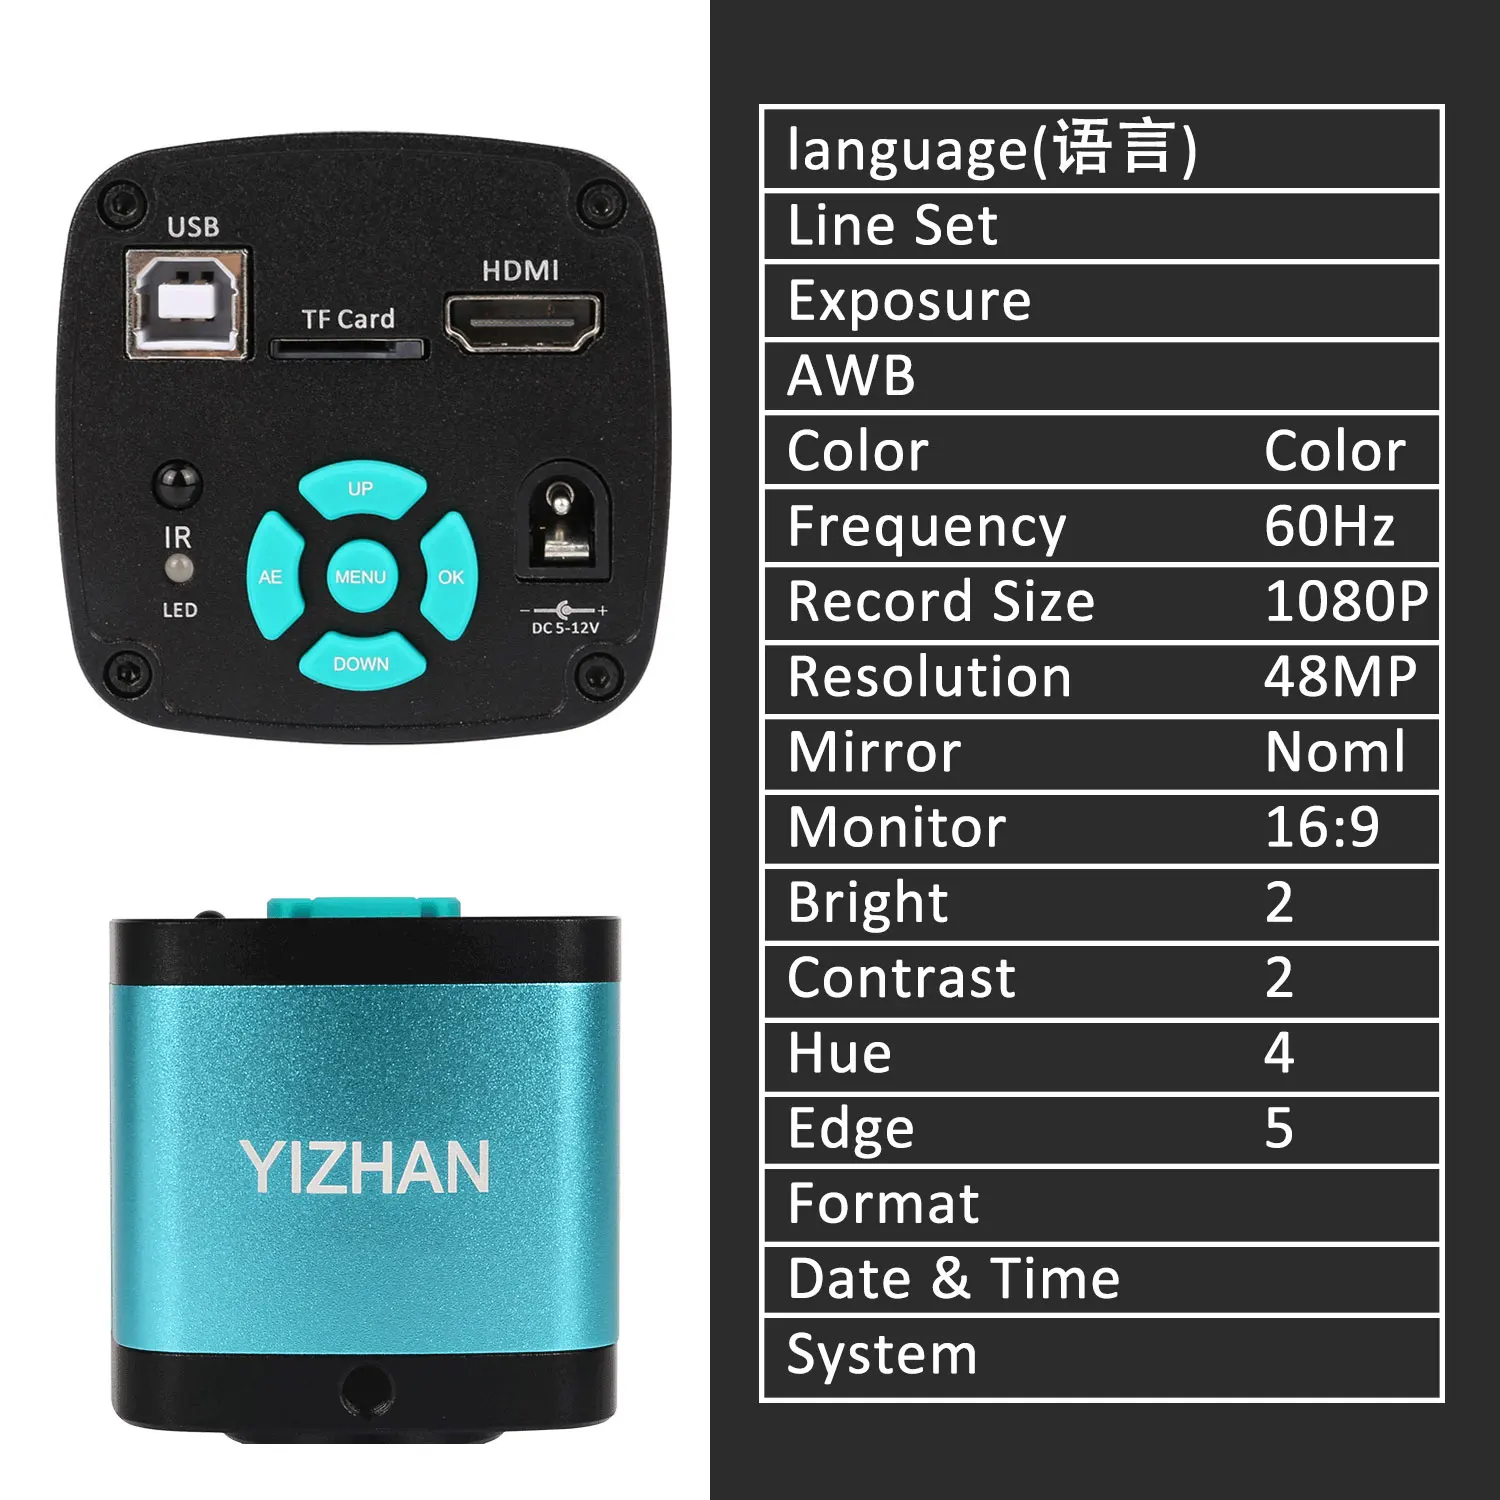
interface: HDMI/USB/VGA utput
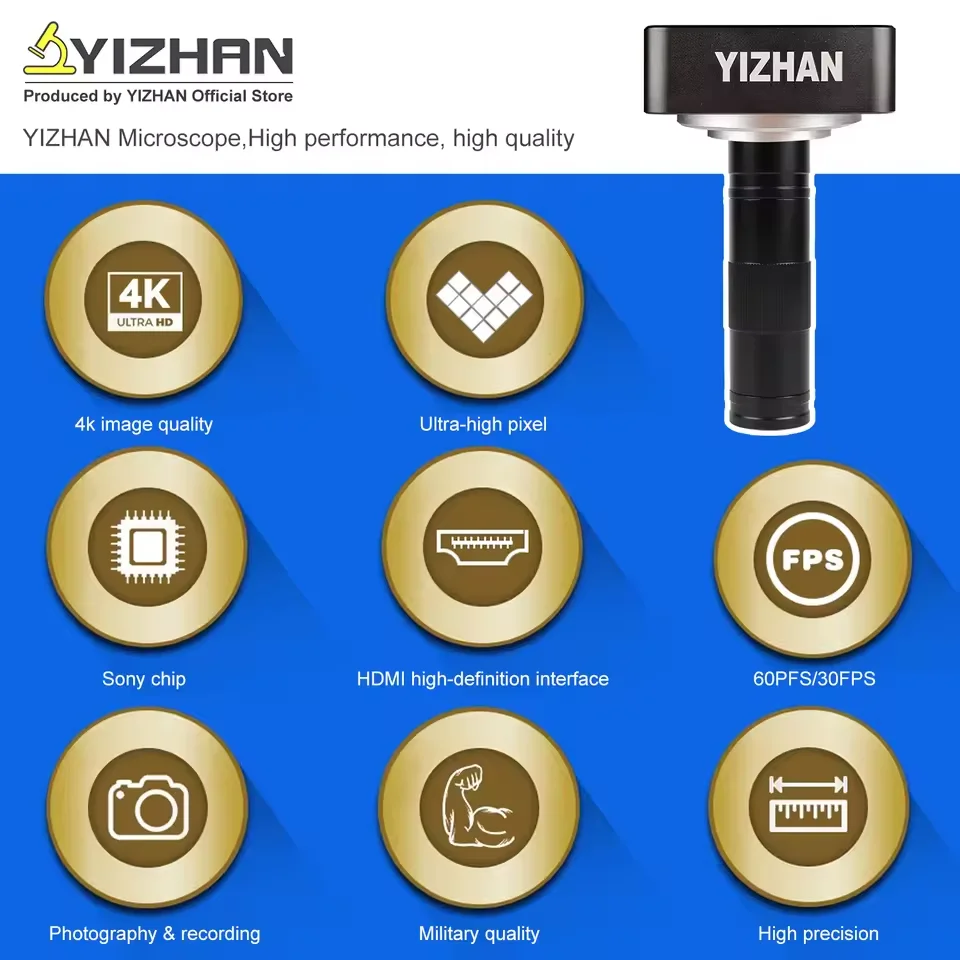
4K Microscope, FULL HD Industrial Microscope, Video Microscope, HDMI USB Microscope, Industrial Video Microscope, usb microscope, microscope for soldering, digital microscope for electronics, microscope camera, stereo microscope, mobile phone microscope, camera hdmi microscope, microscope for mobile phone repair, digital microscope for soldering, laboratory microscope, hdmi electronic welding microscope, hdmi microscope,digital microscope for soldering, microscope digital, soldering microscope, microscope for soldering, microscope for mobile phone repair, digital microscope vga, hdmi digital microscope full hd camera, hdmi electronic welding microscope, electronic microscope, Industrial Microscope For Digital Image Acquisition, 48MP 4K HDMI USB Microscope Camera


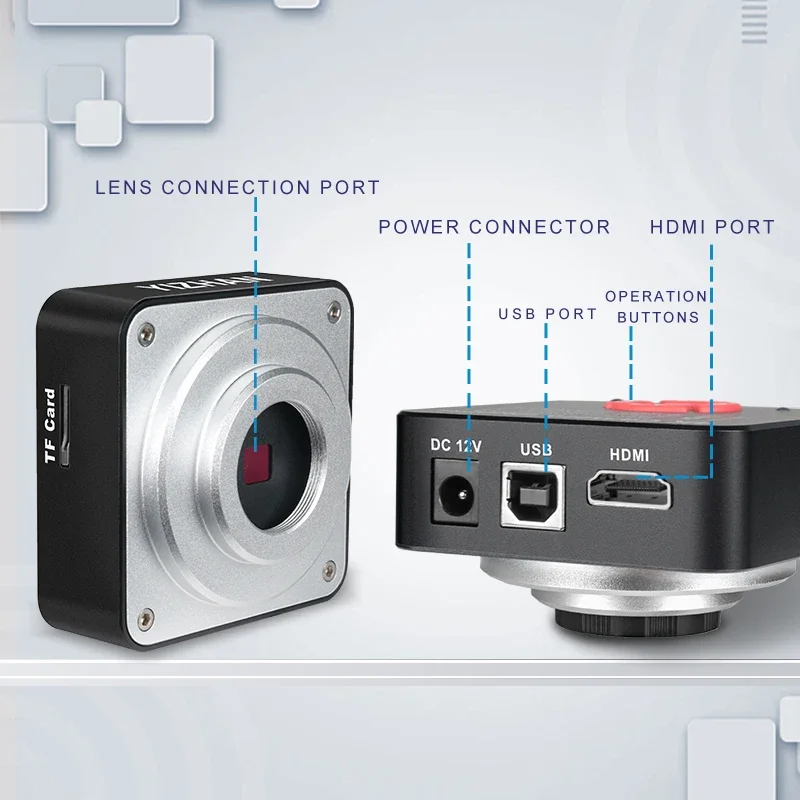
48MP HDMI USB Camera:
Model: Camera with HDMI USB2.0 two output
Image sensor: 48 megapixel Panasonic sensor
Frame rate: 1920*1080 60F/S @ HDMI output
Video save Movie size:4K(25fps) 2K(30fps) 1080P(60fps) 720P(60fps)(Note: If you need to record 4K or 2K video, you need to use the SDHC class10 TF card.)
Housing: All metal
Support:C-Mount lens
Digital magnification: 5 times digital zoom
White balance: Auto/manual
Cross cursor: Support multi-color, size adjustable
TF card interface: Max 32G
video format:MOV
HDMI interface: HDMI/USB output
Image : 48M 8000X6000/38M 7168X5376/26M 5888X4416/20M 5120X3840/16M 4608X3456
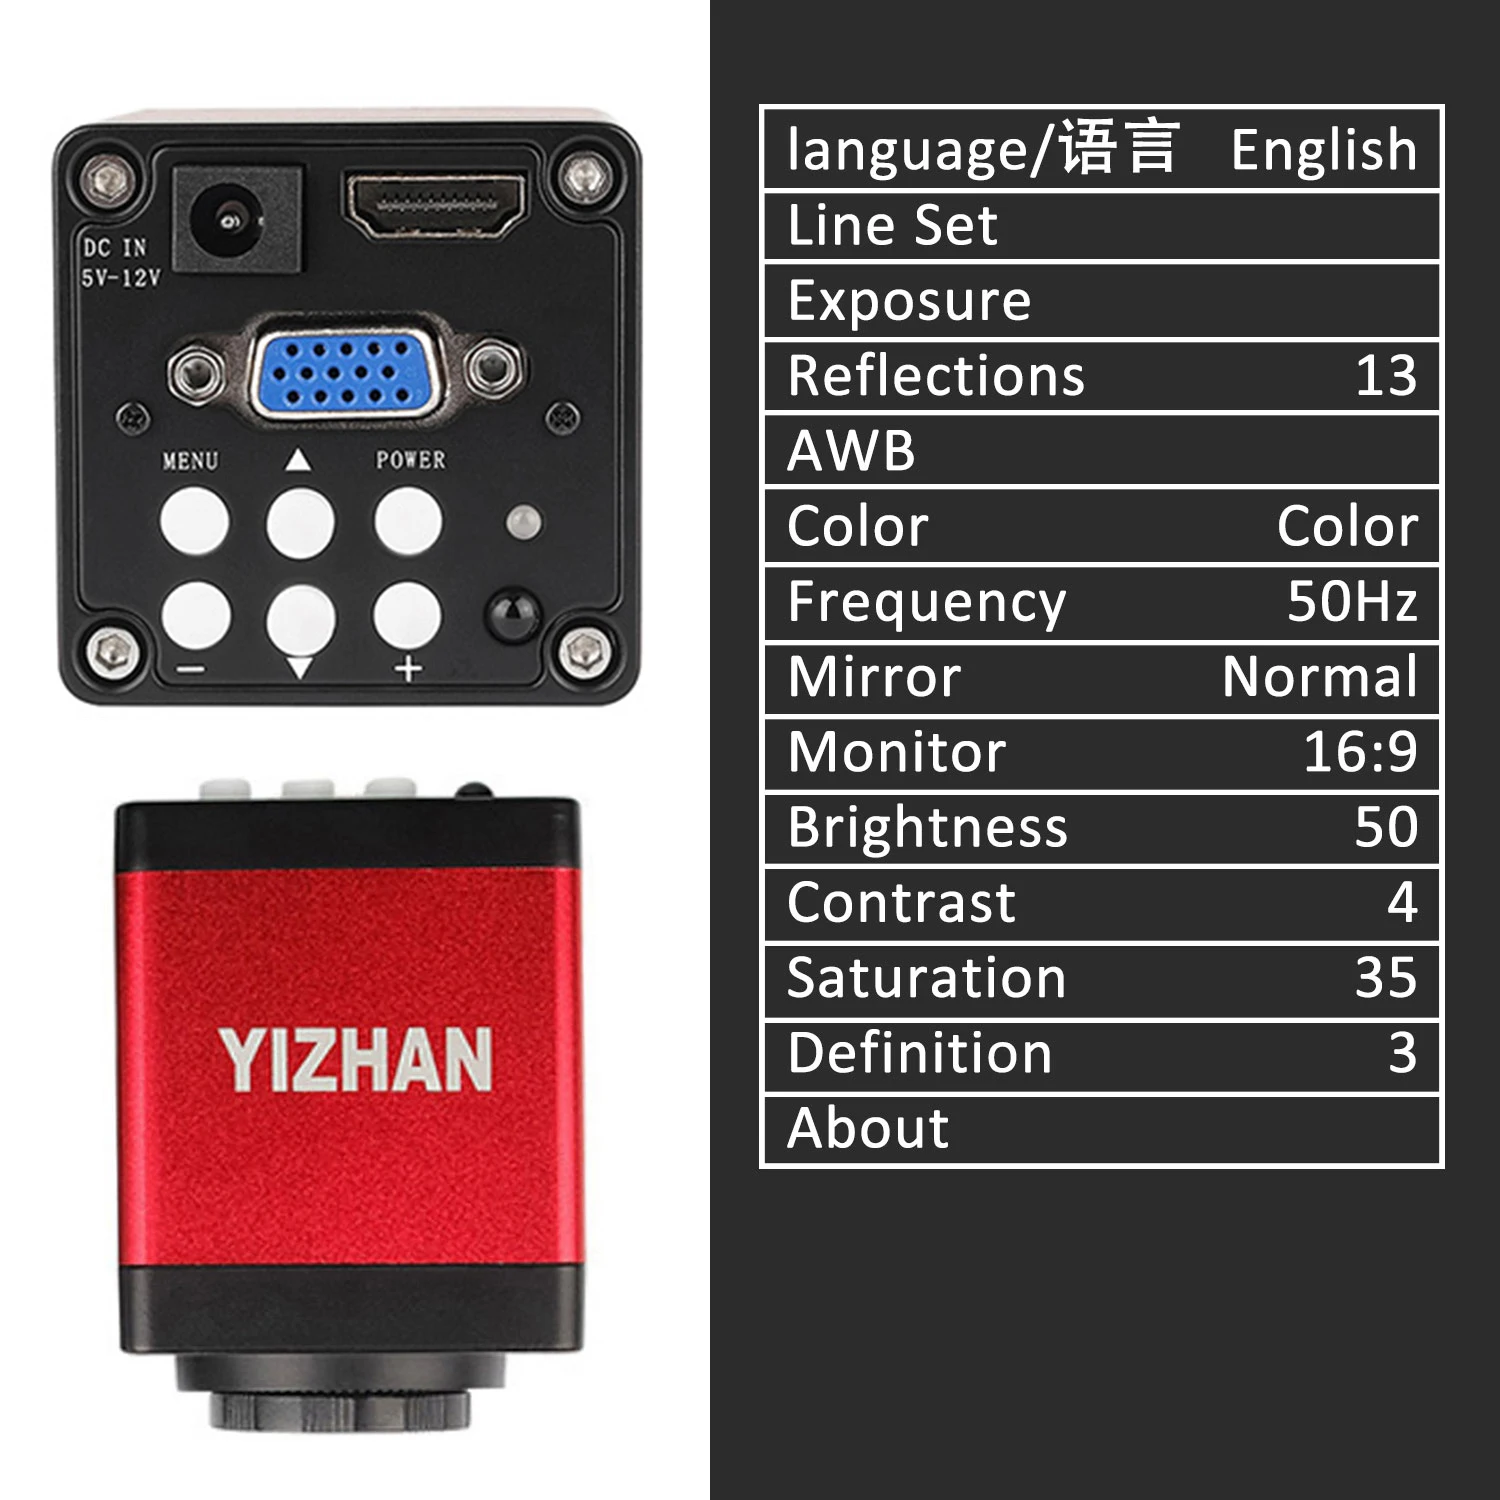
Language:Chinese/English
Mirroring: Support
Frequency:50Hz/60Hz
Monitor:16:9/16:10/4:3
Grid line: 15 Horizontal line, 15 Vertical line, Central scale line,Custom colors,Size
Power supply:5-12V 1A

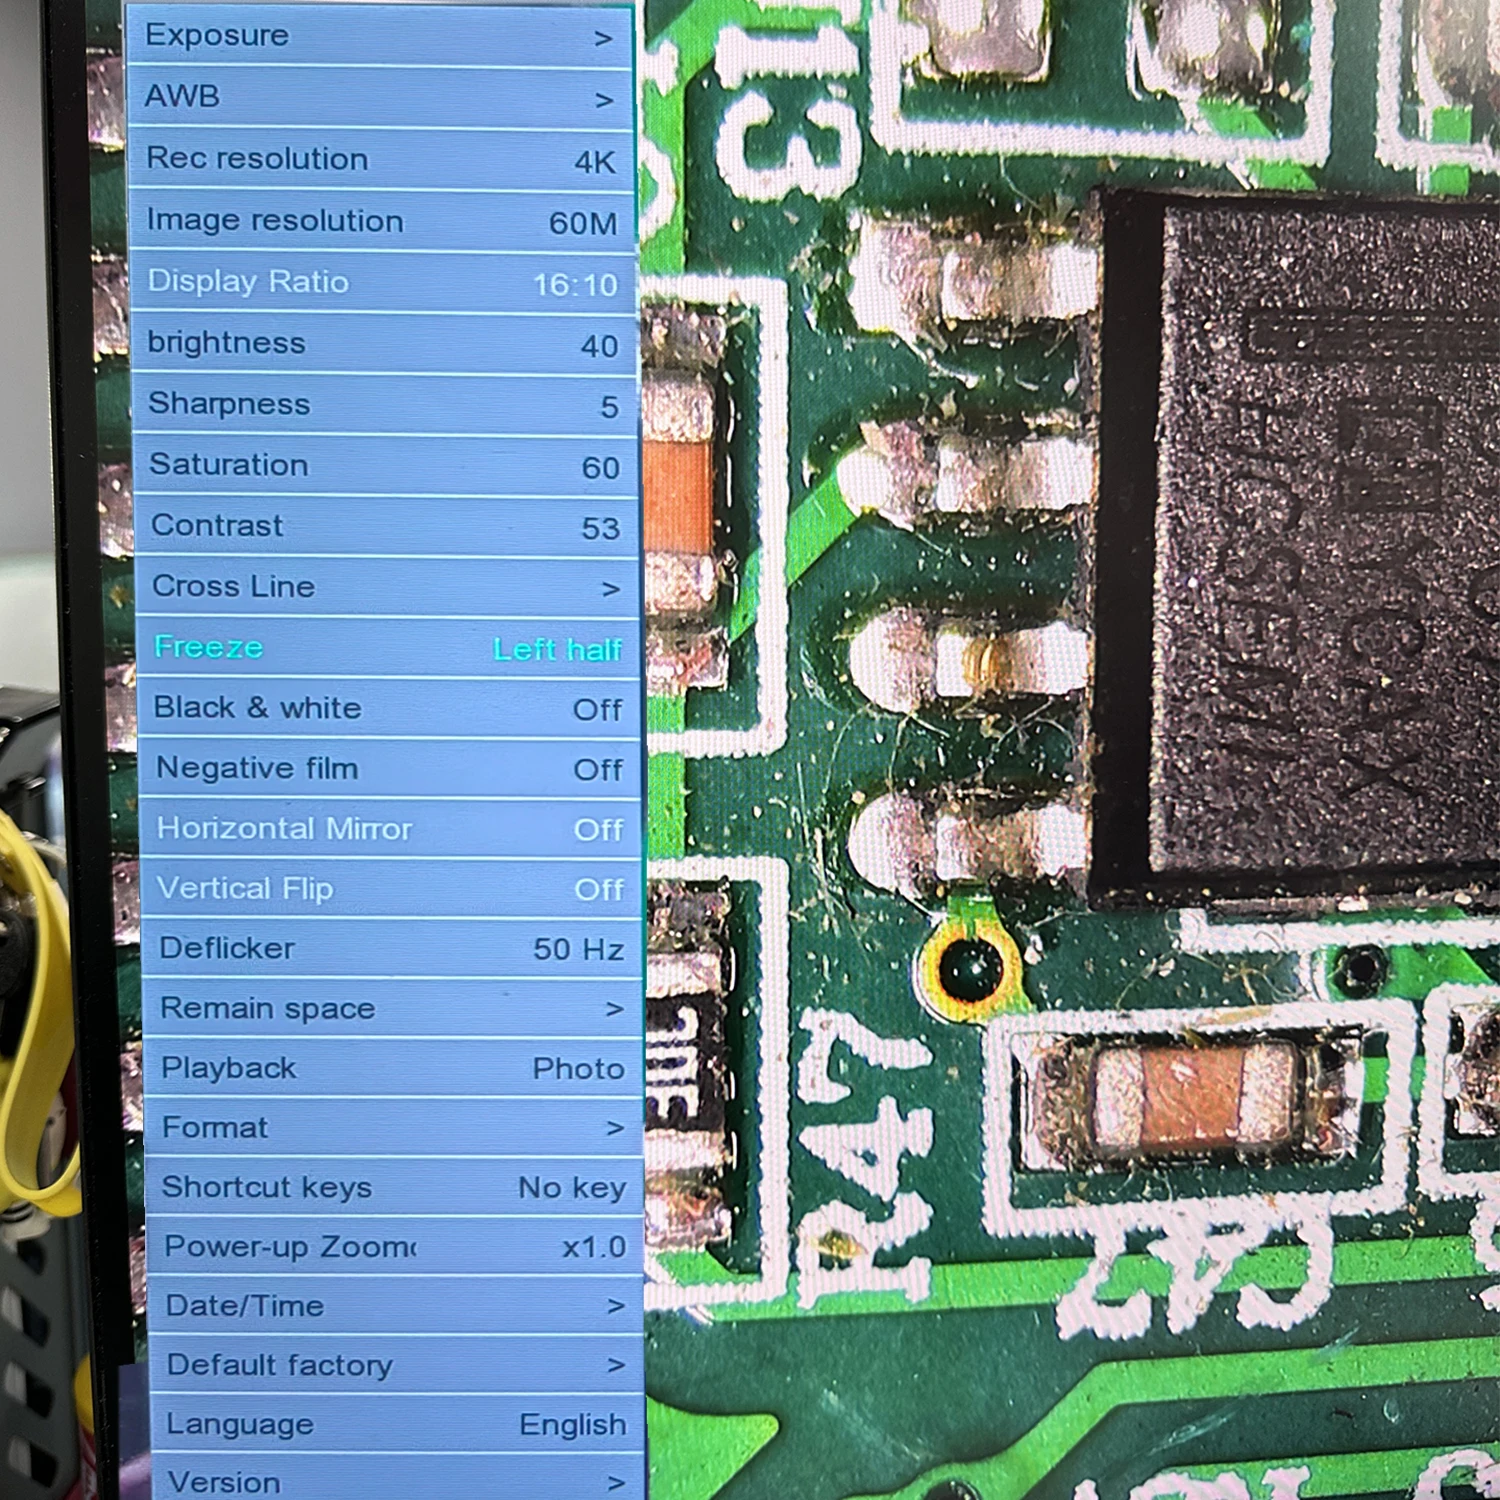
Full 4K HDMI USB-C Microscope Camera
product superiority
◆Using a 2-megapixel imported SONY sensor;
◆With a 1 / 2.8 inch image sensor, the perspective is wider than 1 / 3 inch;
◆HDMI 1080P 60FPS image output ;
◆TYPE-C no-drive output 1080P 30-frame image output;
◆4K video recording;
◆48 Million photos, JPG format, photo size 8000x6000;
◆One-click freeze / thaw function;
◆A 48-megapixel photo recording and a 1080P video recording;
◆Electronic scaling function;
◆automatic exposure / one-click exposure, exposure compensation value adjustment;
◆automatic white balance / one-key white balance, red, green, blue adjustable;
◆Provide 16 line drawing line function, line color, thickness, adjustable position;
◆Provide the center cross-line display / close;
◆Support for TF card storage, up to 64GB support;
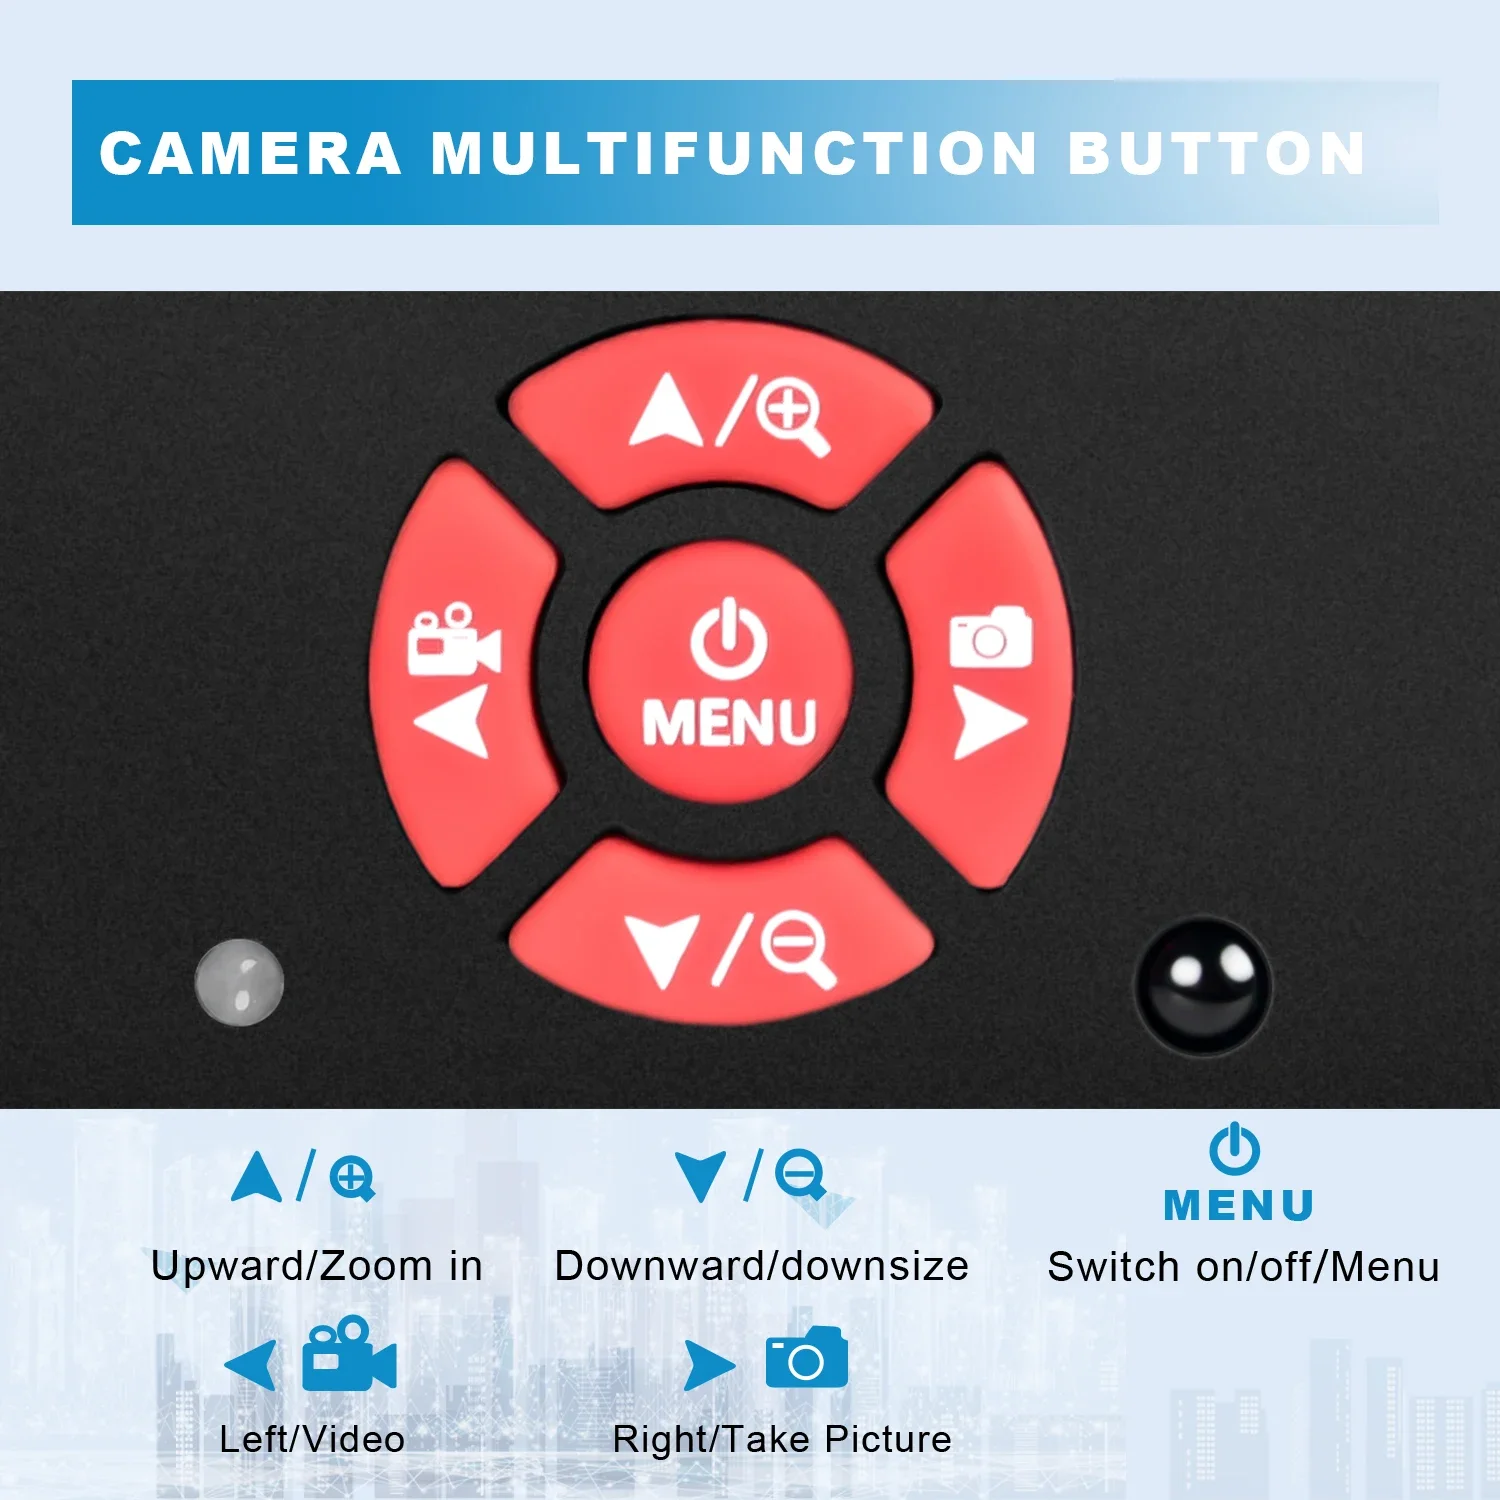
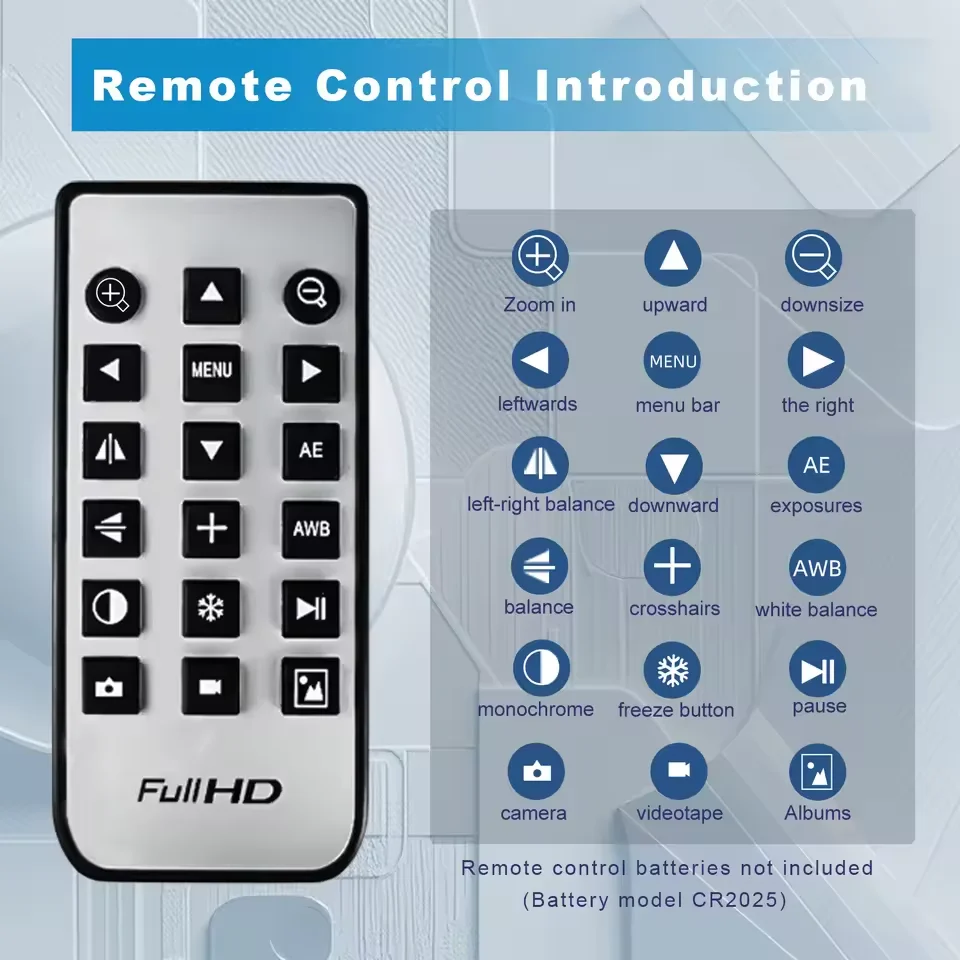
◆Support remote control operation, take photos without shaking the image clearer;
◆Support for Chinese and traditional Chinese and English menu languages;
◆Support the shutdown setting parameter saving;
◆Aluminum alloy shell processed by CNC fine milling technology;
Specification parameters:
Sensor:A 1 / 2.8 SONY 2-megapixel import sensor
Pixel size: 2.9µm × 2.9µm
HDMI output: 1920*1080 60FPS
TYPE-C output: 1920*1080/30 1280*720/30 640*480/30 320*240/30 (MJPG)
Lens interface: C/CS
Exposure: Automatic / manual
Exposure compensation: Support
White balance: Automatic / manual, support for RGB adjustable
Memory card: Max. support is 64GB
Input voltage: DC: 5V
Lineation: 16 lines, with adjustable color, thickness, and position
Centre line: Support
Menu language: English / Chinese
Telecontroller: Support for the remote control operation
Camera net weight: 150G
Size: 66*66*49mm
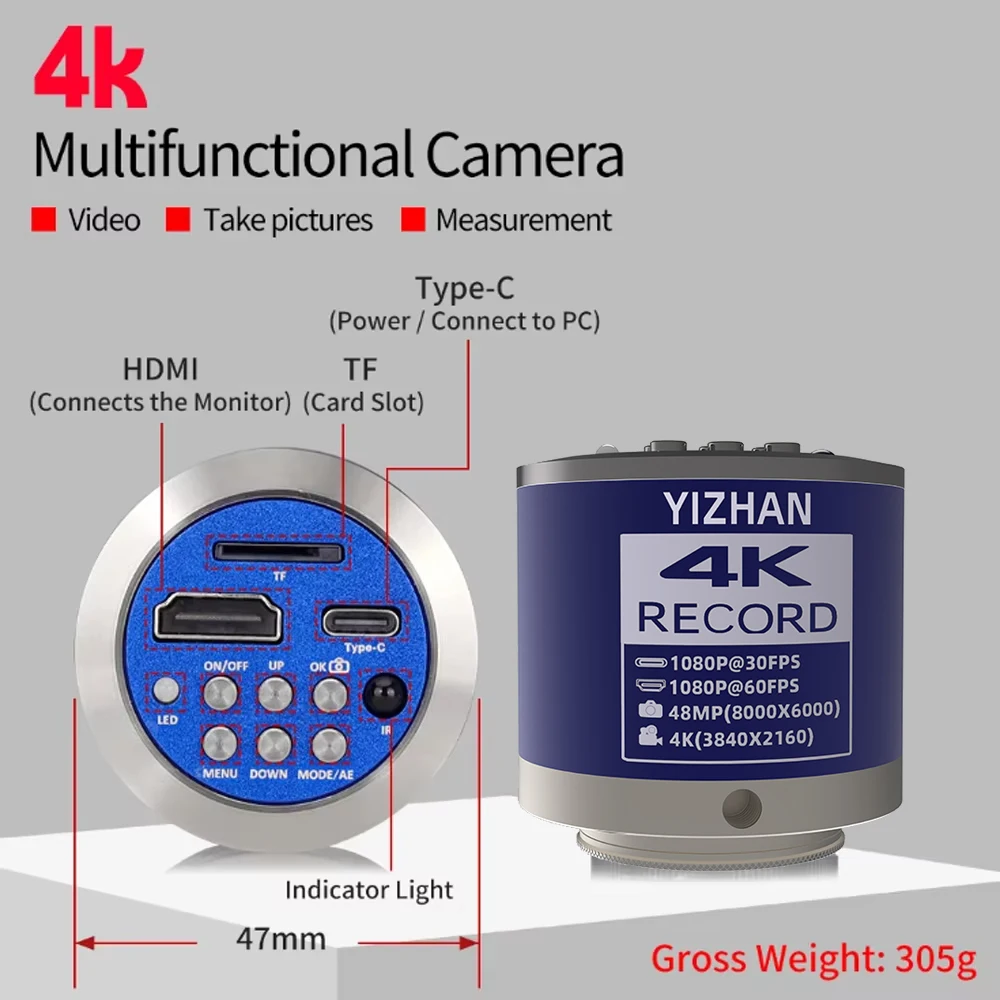


YIZHAN 4K 60MP HDMI USB-C microscope camera
Software Download Address: https://drive.google.com/file/d/19ZvEU5O9uayVsi1dgsJTA-08-XyHPPEW/view?usp=sharing
Sony Chip: IMX415L
Video Interface:HDMI USB-PC TF Card
Record:4K/1080p
Photo:Max 60MP(10368x5888)/4K
HDMI:4K/1080p
USB:4K/2K/1080p
Lens:CS
working voltage:12V
working current:190mA
optical format:1/2.7"
pixel size:1.5um*1.5um
scanning mode:progressive
shutter mode:electronic shutter"
dynamic range:69dB
S/N radio:40dB
OSD language:11 languages: Chinese/English/Traditional Chinese/Japanese/French/Spanish/German/Italian/Portuguese/Russian/Arabic
AWB mode:One-shot white balance/manual/auto
Cross:Support 4 groups: 32 horizontal and vertical lines
line:Color/line width adjustable"
B/W:√
negative:√
mirror flip:√
Freeze:√
Feature:
Output Interface:HDMI USB two output
Sensor: Sony 1/2.7 Inch CMOS Sensor
Housing:Aluminum Alloy
Image Resolution:16MP/21MP/36MP/48MP/60MP/4K/1080P/720P(Use TF card)
Video Display:HDMI Monitor or USB PC
Video Record Resolution:4K/3840x2160@30FPS 1080p/1920x1080@60FPS 720p/1280x720@60FPS(Use TF card)
USB2.0(Drivefree) Record Resolution:1920*1080@30FPS/1280*720@30FPS/640*480@30FPS
HDMI Video Resolution:1920*1080@60F/S 3840x2160@30F/S 1280x720@60F/S
HDMI Scale:Support 4:3,16:9,16:10,Screen
Image and Video Storage:Support
Image and Video Playback:Support
Exposure:Auto Exposure and Manual Exposure(AE value set 0-12)
TF Card Flash Drive:MAX 128GB
Digital Zoom:1-4X
Video Format:MP4
Image Format:JPG
Camera Interface Mounting Diameter:25mm
Camera Interface Standard:C Mount
Lens Interface:25mm C/CS mount
White balance:One key white balance,Manual balance
Color:Black and White/Color
Dynamic Range:69dB
S/N Radio:40dB
Scanning Mode:Progressive
Shutter Mode:Electronic Shutter
Negative:Support
Mirror:Horizontal Mirror and Vertical Mirror
B&W Pictures:Support
Image Freezing:Support
R.G.B Adjustment:Support
Avoid Flicker:50Hz 60Hz
TF Card Formatting:Support
Remote:Infrared Remote Control
Cross Lines:4 Group ,32 Lines.Can set color& width& position,direction
Crosshair:Can adjust color, line size
Power:DC 12V/1A
13MP HDMI VGA Camera:
The sensor: sony 323
Overall dimension: 75*50*50mm
Video Interface:HDMI VGA
Lens:CS
Working voltage:12V
Working current:150mA
Optical format:1/3"
Pixel size:2.8um*2.8um
Pixel array:13MP
TV Lines:1200TVLine
FPS of max image:60FPS
Scanning mode:progressive
Shutter mode:electronic shutter
Dynamic range:65dB
S/N radio:45dB
OSD language:English/Chinese
AWB mode:One time white balance / manual / auto
HDR:Adjustable
Cross line:Support 8 colors / line width adjustable
B/W:allow
Negative:allow
Mirror flip:Support left / right / up / down
Freeze:allow
Compare:allow
Manual set bright,contrast,sharp,saturation:allow
Output of display resolution: HDMI:16:9, 4:3 VGA:1920*1080/1600*900/1440*900/1366*768/1280*1024/1280*720/1024*768/800*600(Supports various displays on the market)
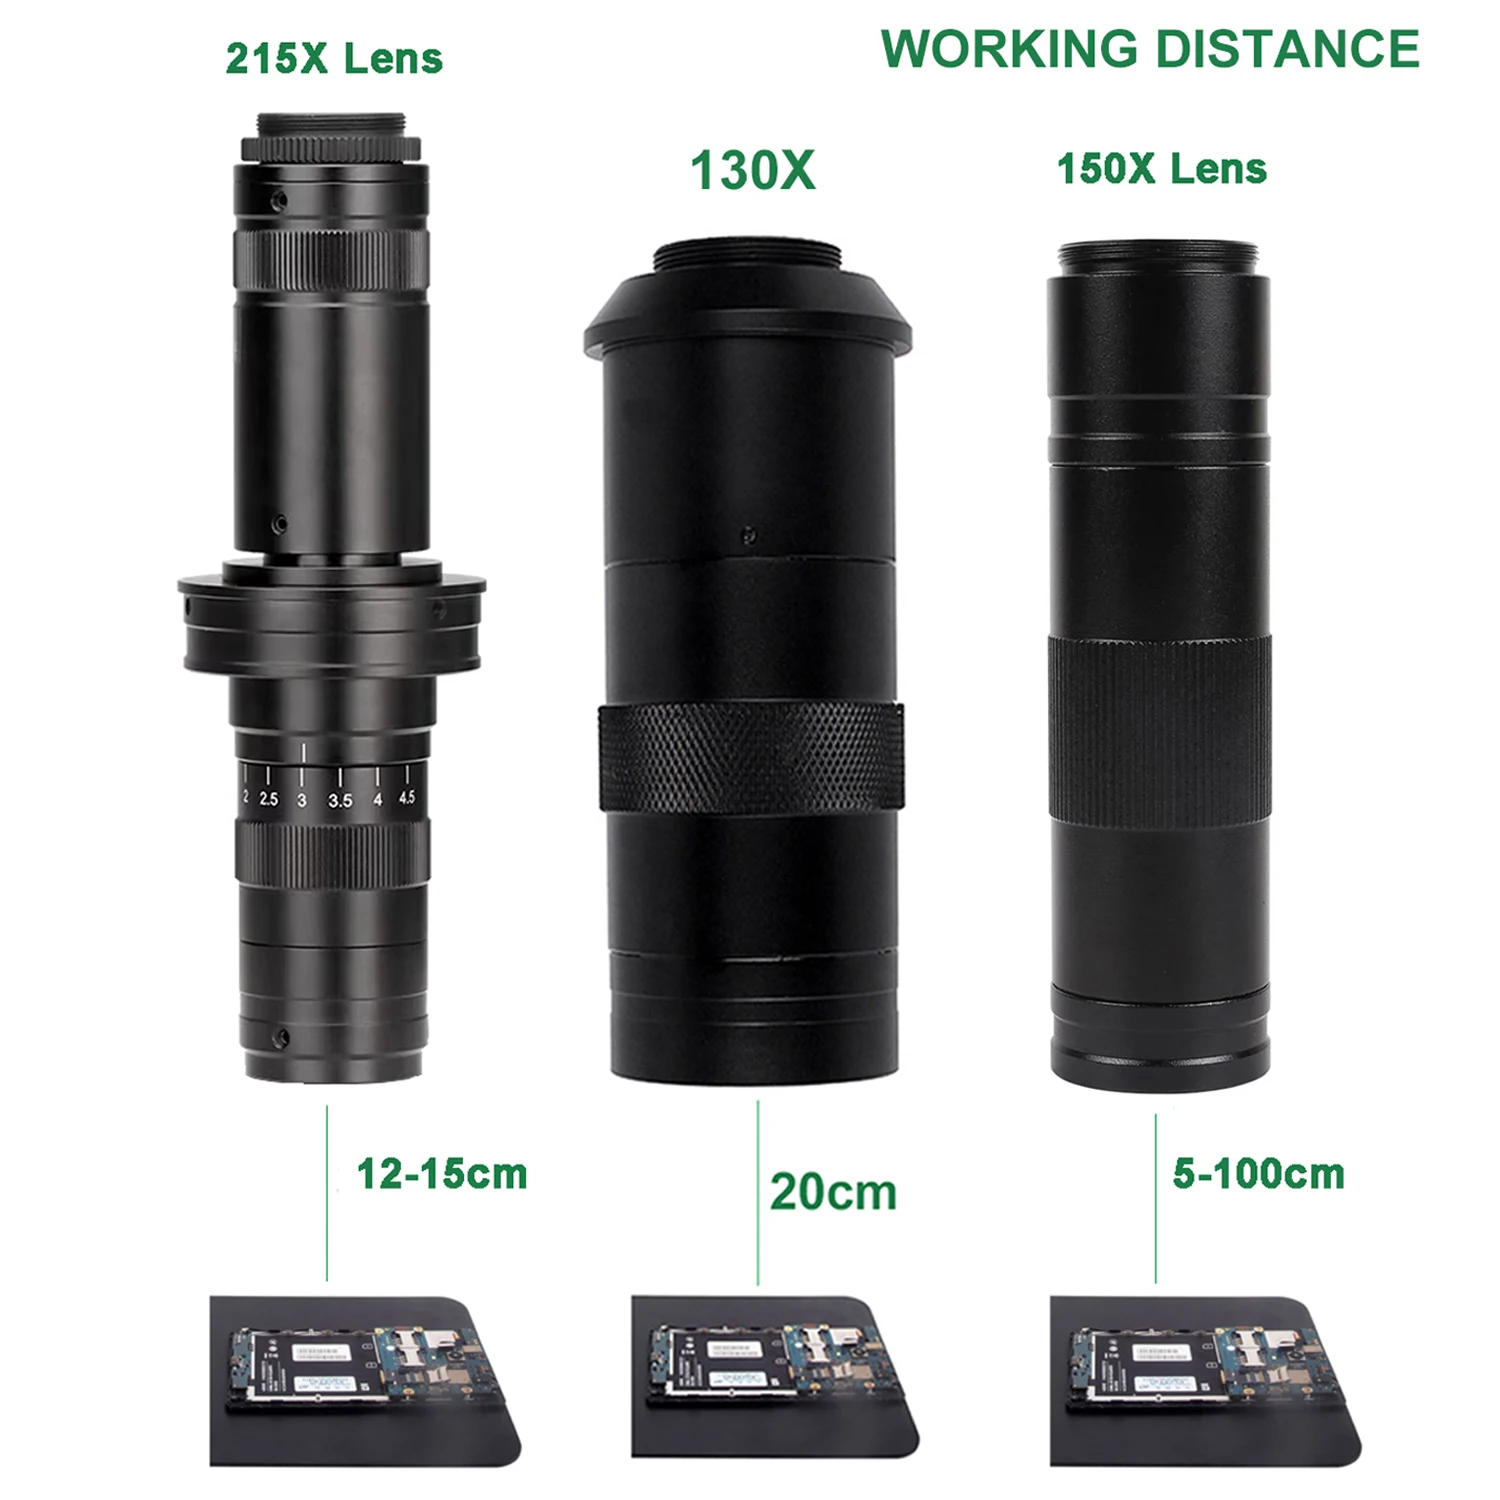
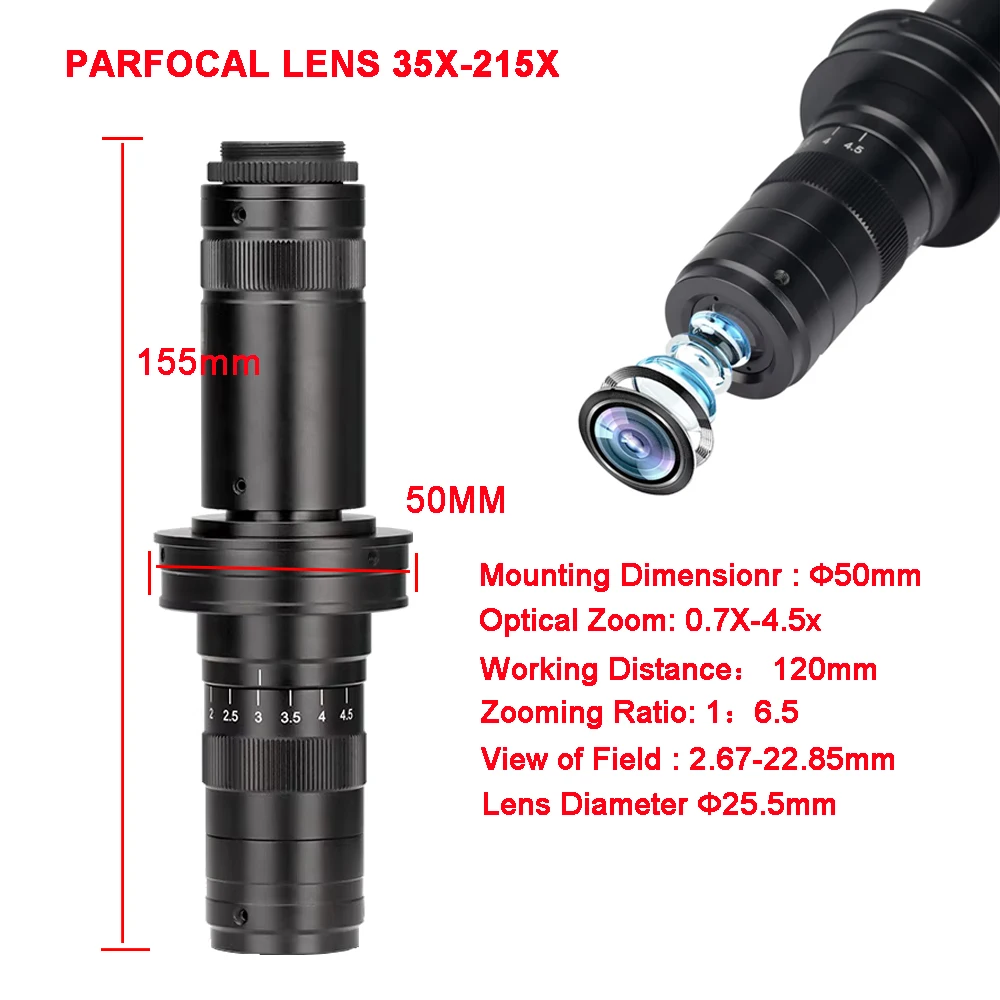
215X Lens
Mounting Dimensionr : 50mm
Optical Zoom: 0.7X-4.5X
Working Distance:120mm
Zooming Ratio:1:6.5
View of Field : 2.67-22.85mm
Lens Diameter:25.5mm
130X Lens:
Work distance: 40mm-170mm
Zoom ratios: 1:17
Magnification Power by 0.1 - 1.3X (about 1 - 130X on the display)
view field of Max multiple : 8mm*4.5mm
view field of Min multiple : 40mm*33mm
Size: 115mm(L) * 40mm(DIA)

150X Lens
Working distance: 50mm-1000mm
zoom ratios: 1 : 15
Magnification Power by 0.15- 2X (about 1 - 150X on the display)
view field of Max multiple : 4.2mm*2.4mm
view field of Min multiple : 130mm*70mm
Size: 30mm(diameter) * 99mm(length)
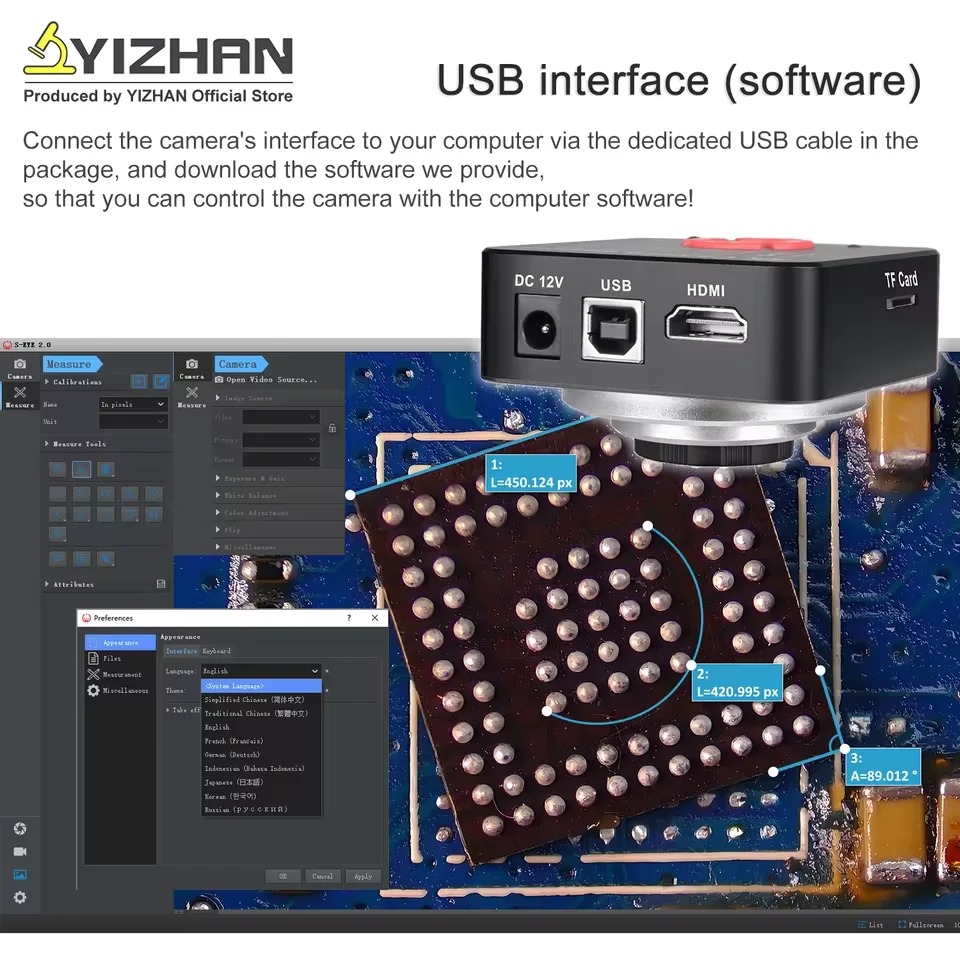
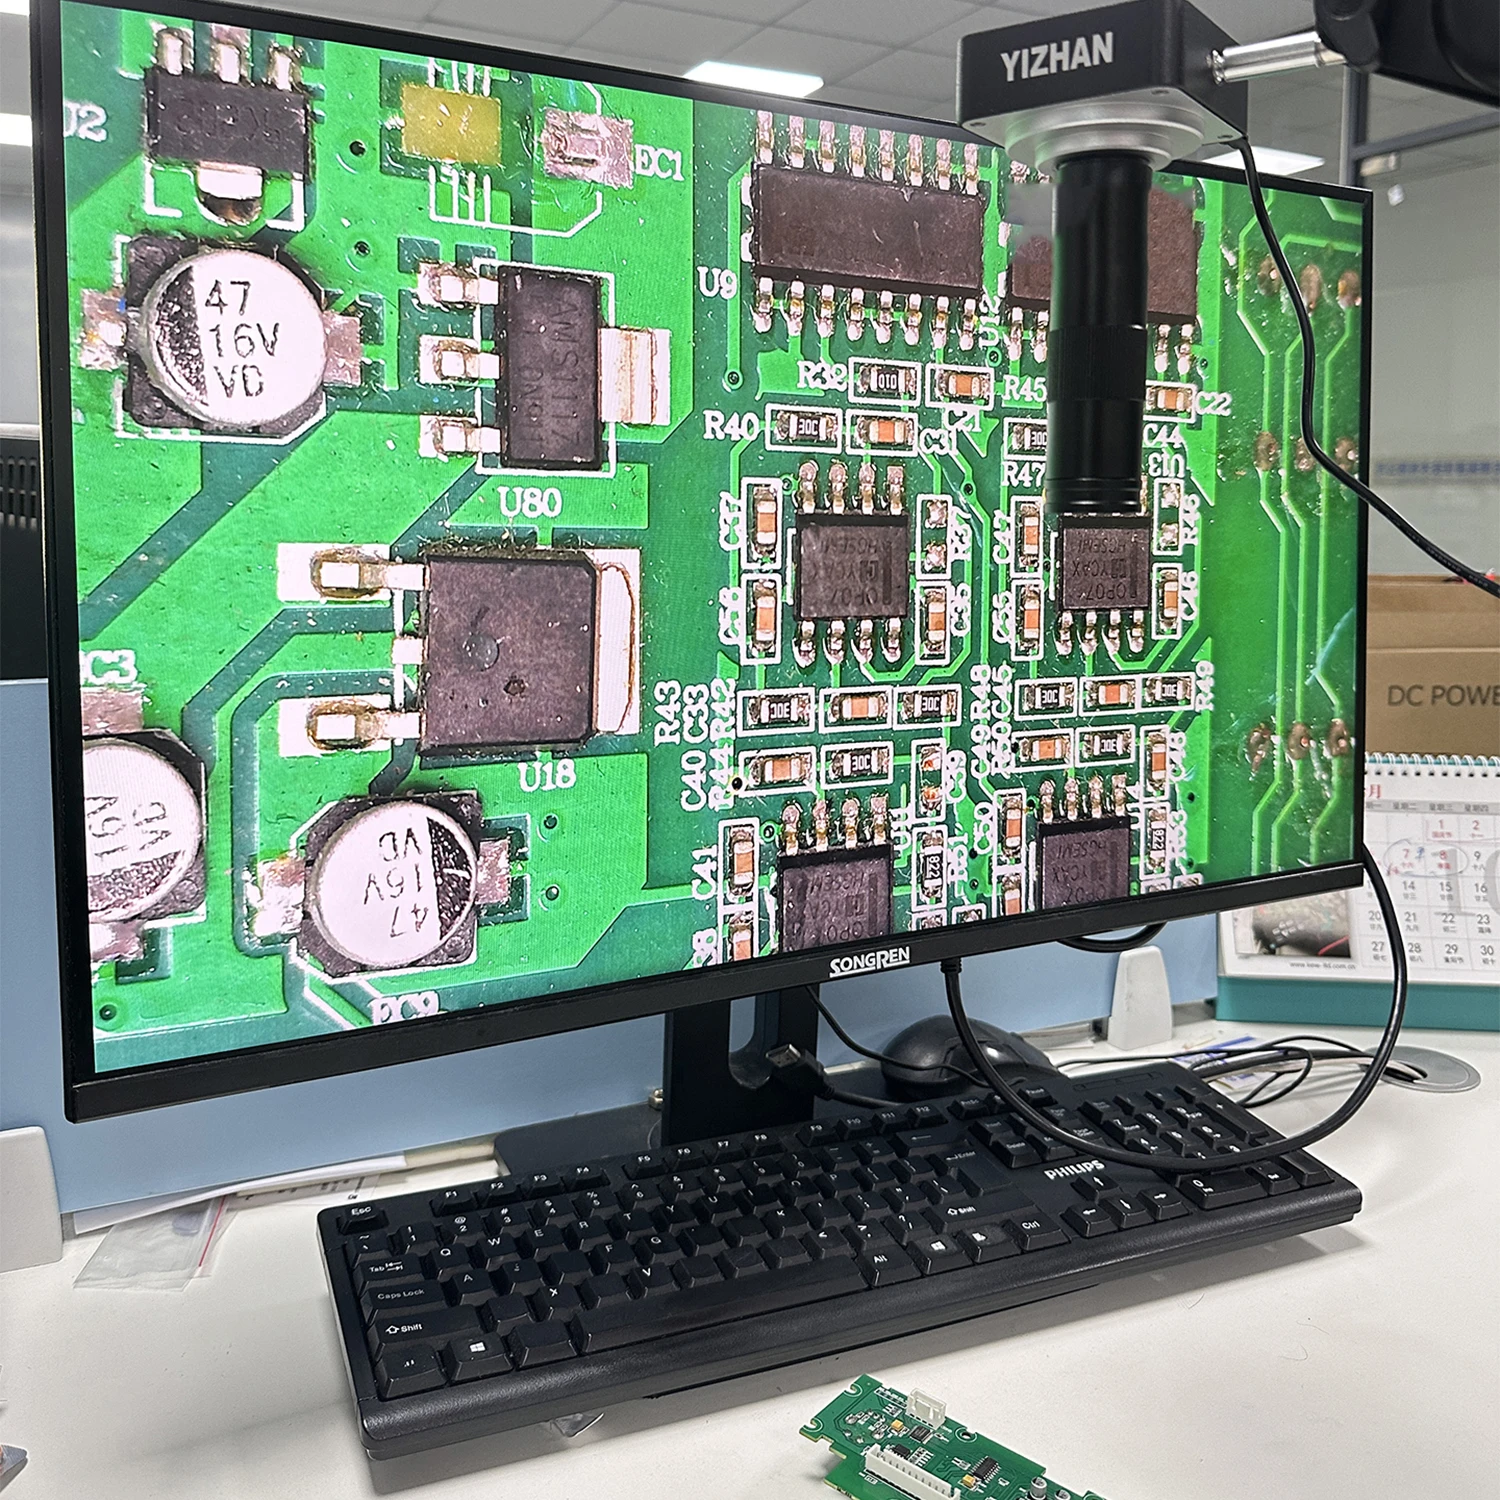
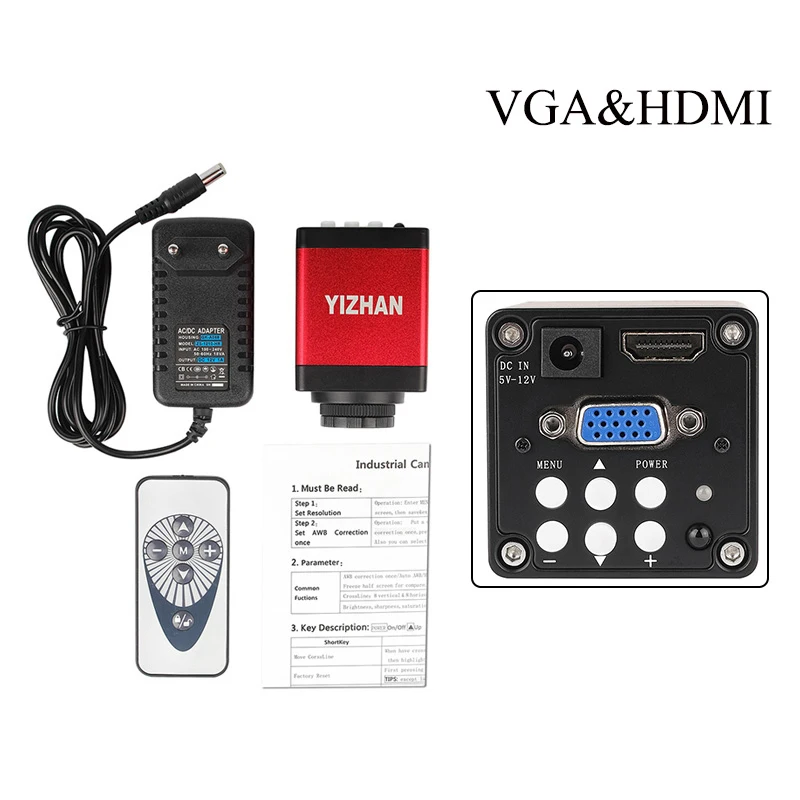
Camera operation details:
1-1. Safety Guidelines
1. In the process of installing the equipment, be sure to read this safety guide carefully, operate strictly in accordance with the installation and use instructions, and keep this manual properly for reference.
2. The power supply voltage of this camera's power adapter is AC100V—240V@50-60Hz, please confirm whether the power supply is within this range before use.
3. The standard power supply of the camera is 12V 1A. It is recommended to use it with the camera's own power adapter.
4. The camera is placed at 0°C to 50°C, and the humidity is less than 90%. It is used in an environmental indoor environment to prevent foreign objects from entering the machine, and do not splash liquid on the machine to prevent danger.
5. Prevent violent vibration and immersion during transportation, storage and installation, so as not to damage the product.
6. Please do not disassemble the camera without authorization. There are no parts that can be repaired by the user.
7. When cleaning the camera housing, please wipe it with a dry soft cloth. If the dirt is serious, please wipe it gently with a neutral detergent.
8. If the image has gray shadows, please use a blower to blow off the dust on the filter, and do not wipe it with detergent.
2-1. Preparation for use:
1. Unscrew the lens cover and install the lens; Note: tear off the dust-proof protective film in front of the photosensitive film! ! !
2. Plug in the HDMI cable and DC power supply respectively, and the LED light is on at this time, indicating that the camera has been turned on;
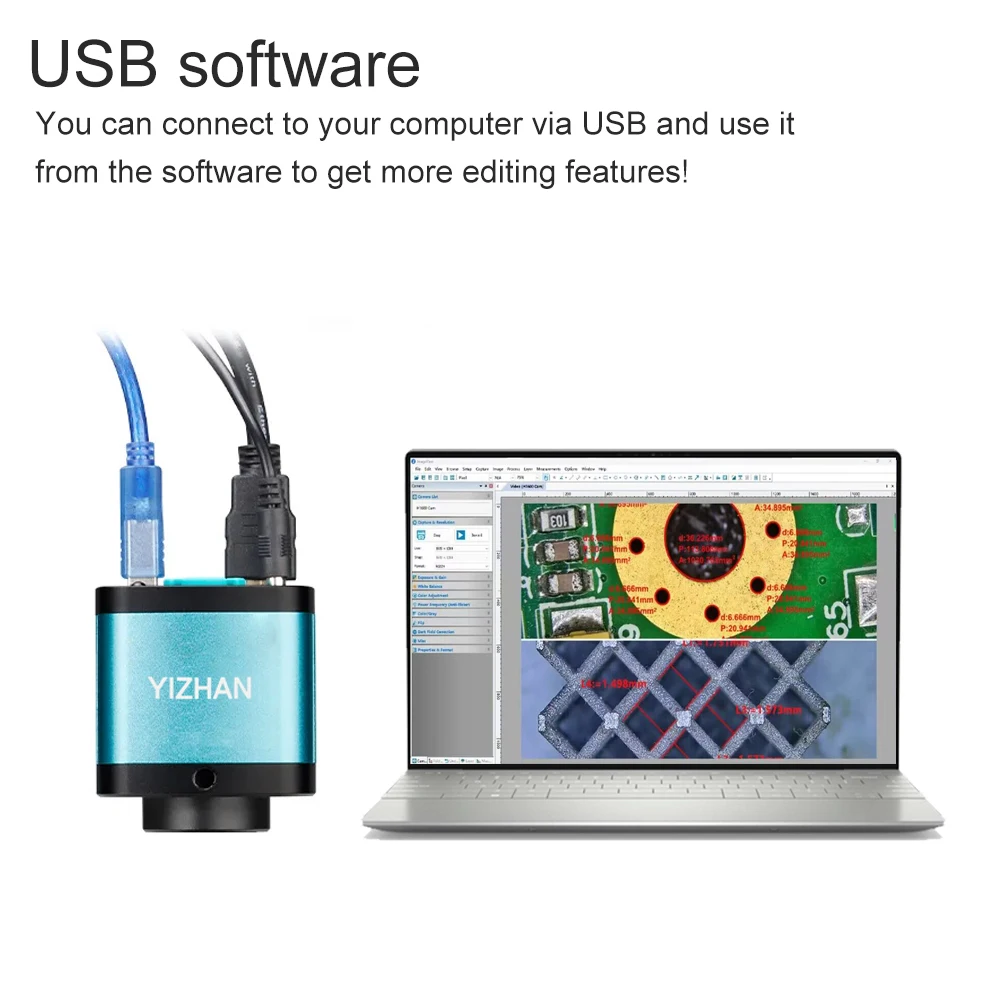
3. After inserting the mouse into the USB interface, use the mouse for setting operations. Right-click on any blank place to display the main menu, click again to hide the menu, the menu will be automatically hidden after 30 seconds without any operation (the mouse arrow will also be hidden without any operation in 30 seconds), click the mouse again to display it again.
2-2. Language setting:
Left mouse click on the language button in the menu bar to switch languages
2-3, take pictures, video, playback
You need to insert a USB flash drive to use it. If the USB flash drive is not inserted or the USB flash drive is not recognized, the icon will be gray.
1. Click the left mouse button on the menu bar "Photograph" and a camera icon will appear in the upper left corner of the display to indicate the completion of the photo.
1. Click the left mouse button on the menu bar "Recording" and the recording time will appear in the upper left corner of the monitor, click again to end the recording.
2. Click the "Playback" in the menu bar with the mouse to switch to the playback interface, and you can see the pictures you have taken and the videos you have recorded.
3-1. Freeze:
Click the "Freeze" button in the menu bar with the left mouse button to freeze the image, and click again to release the freeze.
3-2. White balance setting:
Left-click on the "Camera Settings" to find the "One-key White Balance" button and you can use one-key white balance.
White balance function: used to calibrate the image color, using white as a calibration reference.
Operation method: Place a piece of "white paper (or other white objects)" under the lens to cover the full screen, and then click "one-key white balance" to calibrate the color.
Automatic white balance: real-time automatic calibration of image color
3-3. Exposure settings:
Left mouse click on the "Exposure" button in the menu bar to expose with one click.
One-key exposure function: adjust the light to the camera's default best brightness in the current environment
Automatic exposure function: no matter how the light is adjusted, it will be displayed with the best light effect
4-1. Calibration:
Function: Define the measurement data yourself, as the data standard of the "measurement tool".
Operation method:
1. Place the "ruler (ruler)" under the lens to adjust clearly
2. Note: After the calibration is completed, the focal length of the microscope cannot be adjusted, otherwise the calibration data will cause errors due to the difference between the focal length and the calibration time.
3. Click "(Left line calibration, right circle calibration)" with the left mouse button. After clicking, the menu disappears, indicating that it has been selected, and calibration can be performed.
4. To calibrate a distance of 1mm, double-click the left mouse button on the calibration name column to pop up a keyboard, and then enter the unit and length. Click Confirm again to complete the calibration.
5. The calibrated name will be displayed in the calibration column, multiple calibrations are possible, and the selected one is based on which calibration data
6. Delete the current calibration
7. Lock the calibration area
5-1. Trial instructions for measuring tools:
Note: All the following measurement functions need to be "calibrated" before use to obtain accurate data
1. Point and line distance
Function: used to measure the length between two points, C: the length between two points
Operation method: click the "dot line distance" with the left mouse button, and the menu disappears to indicate that it has been selected. Left click any two points to get the length data between the two points.
rectangle
Function: used to measure rectangles, data C: represents perimeter, S represents area
Operation method: Click the "Rectangle" with the left mouse button and the menu disappears to indicate that it has been selected. Click the two opposite corners of the rectangle to automatically form a rectangle.
Concentric circles,
Function: used to measure the radius of the circle of different sizes at the same position, R1: inner circle radius R2: outer circle radius L: length
Operation method: click the "concentric circle" with the left mouse button, and the menu disappears, indicating that it has been selected. The left button first double clicks on the margin of the circle (the position should not overlap), the third click determines the size of the circle, and the fourth click determines the same The position is different from the size of the circle.
Polygon:
Function: used to measure a variety of irregular objects. S: total area D: total length of the line
Operation method: Click the "Polygon" with the left mouse button and the menu disappears, indicating that it has been selected, click the turning point of the graph with the left button, and the right button ends.
parallel lines:
Function: Used to measure the distance between two parallel lines. L: length
Operation method: Click the "Parallel Line" with the left mouse button, and the menu disappears to indicate that it has been selected. Click the two ends of the first line first, and then click the position of the parallel line.
Polyline:
Role: to measure irregular lines. D: total length
Operation method: click the "polyline" with the left mouse button and the menu disappears, indicating that it has been selected, the left button draws a line, and the right button ends
Three-point circle:
Function: Use the "three-point fixed circle" method to measure circle data. R: radius S: area C: circumference
Operation method: Click the "three-point circle" with the left mouse button, and the menu disappears to indicate that it has been selected. The left button first double clicks on the margin of the circle (the position should not overlap), and the third click determines the size of the circle.
Center distance:
Function: Used to measure the distance between the centers of two circles. L: length
Operation method: Click the "center distance" with the left mouse button, and the menu disappears to indicate that it has been selected. The left button first double clicks on the edge of the circle (the position should not overlap), and the third click determines the size of the circle. Repeat the operation again for the second circle.
Circle distance:
Function: Used to measure the distance from the center of the circle to the straight line. L: length
Operation method: click the "Circle Line Spacing" with the left mouse button, and the menu disappears to indicate that it has been selected. The left button first double clicks on the margin of the circle (the position should not overlap), the third click determines the size of the circle, and then clicks on the line Both ends.
angle:
Function: Use the calculation method of calculating the angle between two lines to measure the degree of the angle.
Operation method: Click the "angle" with the left mouse button and the menu disappears, indicating that it has been selected. The left button first draws a straight line on one side of the angle, then click the other side, and click the fourth button to determine the angle.
radian:
Function: Used to measure the size of the arc. R: radius
Operation method: click the "radian" with the left mouse button and the menu disappears to indicate that it has been selected. The left button first clicks on any point on the margin of the circle twice (the position should not overlap), and the third click determines the size of the radian.
Point line distance:
Function: Measure the distance between a straight line and a point. L: length
Operation method: click the "point line distance" with the left mouse button, and the menu disappears to indicate that it has been selected. Left click on the two ends of the line and then click the measured point.
6-1, measurement settings
Function Description:
1. Measuring line width: adjust the thickness of the line drawn by the measuring tool.
2. Measurement font: adjust the font size of the data displayed in the measurement.
3. Graphic element color: change the color of the line drawing tool, the default is: red
4. Font color: change the color of the data displayed by the line drawing tool, the default is: red
5. Calibration color: the color selected when deleting.
6. Select color: select the color of a certain line.
7-1. Crosshair:
1. Click the "Measuring Tool" in the menu bar with the left mouse button.
2. Click the line sequence to select the line number, and then click "Display" to display the selected line.
3. Click Center to center the selected line
4. Click and drag the X axis to move the vertical line position, and drag the Y axis to move the horizontal line position.
8-1. Import PNG file:
1. Change the suffix of the picture that needs to be imported into the camera to .png
2. The picture resolution must be: 1920X1080
3. Enter the file into the root directory of the U disk
4. Insert the USB flash drive into the camera usb port, wait for about 5 seconds for the camera to recognize the USB flash drive, and then click the folder to enter the USB flash drive.
5. After entering the U disk, find the png file that was admitted to the U disk, click Open or double-click to confirm.
6. It is hidden by default, you can see the imported PNG file by canceling the hidden.
NOTE
Our Service time
Our Working time is Monday to Friday 9:00 AM to 7:00 PM BeiJing Time.
All orders will not be processed at weekend and holidays.
Warranty&Return
Our store provides free replacement for orders within 30 days from delivery date. For orders from 1 to 12 months, you have to pay some parts of order value to get replaced. For order older than 12 months, we will give small discounts.
Feedback
Your feedback is important to us.Please give us 5 star if you have not any question.
Please contact us first if you have any problems,i will reply you within 10 minutes
during working time,and we promise to solve your problem within 24 hours.